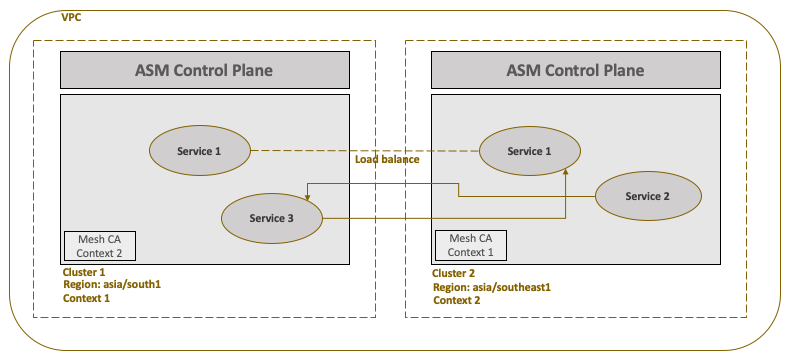
In this section, we would provide the high level steps to implement multi cluster Anthos Service Mesh in in a single VPC network.
Prerequisites
Following are the pre-requisite before implementing the Multi cluster service mesh setup
- You have already setup a Google project with a single VPC and two regional subnets. You can opt for any available two regions to implement this use case. For our setup, we will take Mumbai as one region and Singapore as another.
- You have Anthos GKE cluster setup in both the regions along with ASM version 1.8.3 installed. To understand how to install ASM, please follow the link to our website to get the latest installation steps – https://cloudsolutions.academy/solution/how-to-install-anthos-service-mesh-on-gke/.
- The ASM Certificate Authority (CA) used will be Mesh CA (only available for GKE clusters). You could also use Citadel CA as an alternate option.
Set the cluster context
As a first step, identify the context of each cluster. The below command will lists the different cluster context.
kubectl config get-contexts -o name
gke_sandbox-111111_asia_south1-a_cluster-1
gke_sandbox-111111_asia_southeast1-a_cluster-2
The cluster context name follows a pattern: project-id_cluster-location_cluster_name. Assign the context name to $ctx1 and $ctx2 environment variables, each representing cluster one and two respectively.
export ctx1=gke_sandbox-111111_asia_south1-a_cluster-1
export ctx2=gke_sandbox-111111_asia_southeast1-a_cluster-2
Setup endpoint discovery between clusters
In this step you will enable each cluster to discover service endpoints of their counterpart, so that cluster one will discover service endpoints of the second cluster and vice versa.
istioctl x create-remote-secret –context=$ctx1 –name=cluster-1 | \
kubectl apply -f – –context=$ctx2
istioctl x create-remote-secret –context=$ctx2 –name=cluster-2 | \
kubectl apply -f – –context=$ctx1
You enable this by creating secrets for each cluster that grants access to kube API server of that cluster. Each secret is the certificate derived from the common root CA, in this case Mesh CA. You then apply the secret to the other cluster. In that way secrets are exchanged and the clusters are able to see the service endpoints of each other.
Setup the sample microservices application for testing
The application as part of this use case is a simple NodeJS application that prints the service name. Below is the sample code:
‘use strict’;
const express = require(‘express’);
const PORT = 9000;
const HOST = ‘0.0.0.0’;
const app = express();
app.get(‘/’, (req, res) => {
res.send(‘Service 1: version 1.0\n\n’);
});
app.listen(PORT, HOST);
console.log(Running on http://${HOST}:${PORT});
You will deploy four distinct deployments (containers) of the above application – nodeapp1 (ver 1) and nodeapp3 deployments in the first cluster and nodeapp1 (ver 2) and nodeapp2 deployents in the second cluster.
Our mesh topology will look like the following:

The source for the the application is available at https://github.com/cloudsolutions-academy/anthos-servicemesh/tree/master/microservices
We will use nodeapp1 service to demonstrate load balancing – where request to common nodeapp1 service can either print ‘version 1’ or ‘version 2’. We will also demonstrate communication between two different services i.e nodeapp3 and nodeapp2. All the services will be able to communicate with each other through direct endpoint discovery. There will be no gateway routing involved as all the services are part of the same VPC.
Our Kubernetes resource deployment setup will look like the following:
|
Cluster Name |
Kubernetes Service |
Kubernetes Deployment |
|
cluster-1 |
nodeapp1 | ClusterIP | 80:9000 |
nodeapp1-v1 |
|
nodeapp3 | ClusterIP | 80:9000 |
nodeapp3 |
|
|
nodeapp2 | ClusterIP | 80:9000 |
||
|
cluster-2 |
nodeapp1 | ClusterIP | 80: 9000 |
nodeapp1-v2 |
|
nodeapp2 | ClusterIP | 80:9000 |
nodeapp2 |
|
|
nodeapp3 | ClusterIP | 80:9000 |
The mesh will use Kubernetes DNS to resolve the service name with its endpoint. In order for the DNS lookup to be successful, the target services must be deployed in both the clusters even if there are no instances of service’s pod running in the client (calling) cluster. If the endpoint is not found in the calling cluster the mesh will route the request to the second cluster.
To build and deploy the micro services application to GKE cluster, kindly follow the generic steps listed on our website – https://cloudsolutions.academy/how-to/building-the-production-environment-and-deploying-microservices/build-the-microservice-container/
Note – We will update this step later with specific instructions pertaining to this application
Testing service to service communication
To test the cross-cluster communication, you can call the nodeapp1 service from nodeapp3 pod.
kubectl exec -it $(kubectl get pod -l app=nodeapp3 -o jsonpath='{.items[0].metadata.name}’) — curl http://nodeapp1/
Invoke this multiple times and you will see load balancing in action. It will print output from both the versions of service nodeapp1
Service1: ver 1.0
Service1: ver 2.0
You can also test the communication between nodeapp3 and nodeapp2. You can invoke the nodeapp2 service from the nodeapp3 pod.
kubectl exec -it $(kubectl get pod -l app=nodeapp3 -o jsonpath='{.items[0].metadata.name}’) — curl http://nodeapp2/
As you can see it was so easy and seamless to setup cross-cluster mesh and enable communication across clusters in a single network. In the next section, we would look at how to implement cross-cluster mesh in two different VPC networks.