The bmctl tool is a common-line tool for creating clusters in Anthos clusters on bare metal. The bmctl can automatically set up the necessary Google service accounts and enable required Google Service APIs for Anthos clusters on bare metal installation,
Follow the step for running the bmctl tool –
- First, authenticate with google cloud with your credentials, so you can create and manage service accounts by issuing the following command
> gcloud auth login –update-adc
- Once authenticated, set your google cloud project id for bmctl execution. Please note you need to have Editor or Owner role to the project.
> gcloud config set project <project-id>
- Next execute the bmctl tool to generate the deployment artifacts that would be used for installing the cluster
> bmctl create config -c bm-cluster-demo \
–enable-apis –create-service-accounts –project-id=<project-id>
The above command would enable the required Google APIs for the project (like anthos.googleapis.com and so on), create service accounts with the required roles for the project access and create the configuration file for cluster setup in bmctl-workspace/bm-cluster-demo/ folder as shown in figure below
- Next, edit the bmctl-workspace/bm-cluster-demo/bm-cluster-demo.yaml. The lines highlighted in bold needs to be changed as per below. Look for comments starting with #change. Please note, the file below is a snippet of the generated file.
# bmctl configuration variables. Because this section is valid YAML but not a valid Kubernetes
# resource, this section can only be included when using bmctl to
# create the initial admin/hybrid cluster. Afterwards, when creating user clusters by directly
# applying the cluster and node pool resources to the existing cluster, you must remove this
# section.
gcrKeyPath: /home/navveen/bmctl-workspace/.sa-keys/hazel-flag-303514-anthos-baremetal-gcr.json
sshPrivateKeyPath: /home/navveen/.ssh/id_rsa
#change this to path where you have created the ssh key.
—
apiVersion: v1
kind: Namespace
metadata:
name: cluster-bm-demo-cluster
#This is name of cluster you can change or leave this as-is
—
apiVersion: baremetal.cluster.gke.io/v1
kind: Cluster
metadata:
name: bm-demo-cluster
namespace: cluster-bm-demo-cluster
spec:
# Cluster type. This can be:
# 1) admin: to create an admin cluster. This can later be used to create user clusters.
# 2) user: to create a user cluster. Requires an existing admin cluster.
# 3) hybrid: to create a hybrid cluster that runs admin cluster components and user workloads.
# 4) standalone: to create a cluster that manages itself, runs user workloads, but does not manage other clusters.
type: hybrid
#change type to hybrid.
# Anthos cluster version.
anthosBareMetalVersion: 1.7.0
# GKE connect configuration
gkeConnect:
projectID: hazel-flag-303514
#Project id that we had specified earlier, leave this as-is
# Control plane configuration
controlPlane:
nodePoolSpec:
nodes:
# Control plane node pools. Typically, this is either a single machine
# or 3 machines if using a high availability deployment.
– address: 10.200.0.3
#Change address to ip address of the control plane node – 10.200.0.3, that we had
#configured as part of VLAN earlier
# Cluster networking configuration
clusterNetwork:
# Pods specify the IP ranges from which pod networks are allocated.
pods:
cidrBlocks:
– 192.168.0.0/16
# Services specify the network ranges from which service virtual IPs are allocated.
# This can be any RFC1918 range that does not conflict with any other IP range
# in the cluster and node pool resources.
services:
cidrBlocks:
– 10.96.0.0/20
# Load balancer configuration
loadBalancer:
# Load balancer mode can be either ‘bundled’ or ‘manual’.
# In ‘bundled’ mode a load balancer will be installed on load balancer nodes during cluster creation.
# In ‘manual’ mode the cluster relies on a manually-configured external load balancer.
mode: bundled
# Load balancer port configuration
ports:
# Specifies the port the load balancer serves the Kubernetes control plane on.
# In ‘manual’ mode the external load balancer must be listening on this port.
controlPlaneLBPort: 443
# There are two load balancer virtual IP (VIP) addresses: one for the control plane
# and one for the L7 Ingress service. The VIPs must be in the same subnet as the load balancer nodes.
# These IP addresses do not correspond to physical network interfaces.
vips:
# ControlPlaneVIP specifies the VIP to connect to the Kubernetes API server.
# This address must not be in the address pools below.
controlPlaneVIP: 10.200.0.49
#change Control Plane VIP to 10.200.0.49, based on our VLAN configuration
# IngressVIP specifies the VIP shared by all services for ingress traffic.
# Allowed only in non-admin clusters.
# This address must be in the address pools below.
ingressVIP: 10.200.0.50
#Uncomment ingressVIP and change Ingress Plane VIP to 10.200.0.50, based on our
#VLAN configuration
# AddressPools is a list of non-overlapping IP ranges for the data plane load balancer.
# Address pool configuration is only valid for ‘bundled’ LB mode in non-admin clusters.
addressPools:
– name: pool1
addresses:
# # Each address must be either in the CIDR form (1.2.3.0/24)
# # or range form (1.2.3.1-1.2.3.5).
– 10.200.0.50-10.200.0.70
#Uncomment addressPools and add Load Balancer IP ranges 10.200.0.50-10.200.0.70
#based on our VLAN configuration
# A load balancer node pool can be configured to specify nodes used for load balancing
clusterOperations:
# Cloud project for logs and metrics.
projectID: hazel-flag-303514
# Cloud location for logs and metrics.
location: us-central1
—
# Node pools for worker nodes
apiVersion: baremetal.cluster.gke.io/v1
kind: NodePool
metadata:
name: node-pool-1
namespace: cluster-bm-demo-cluster
spec:
clusterName: bm-demo-cluster
nodes:
– address: 10.200.0.4
– address: 10.200.0.5
#Change address to IP address of our worker nodes – 10.200.0.4 and 10.200.0.5
# based on our VLAN configuration
- Save the file and exit the editor.
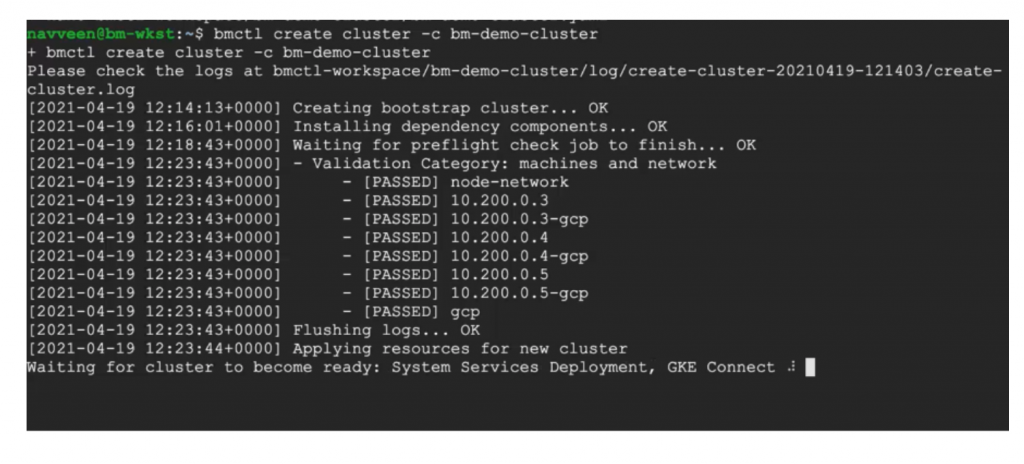
- Next create the cluster by running the following command
> bmctl create cluster -c bm-demo-cluster
The bmctl runs various preflight checks on your environment to ensure it meet the hardware specifications, network connectivity between cluster machines, Load Balancer node is on L2 network and other conditions to ensure the Anthos cluster can be installed on the nodes specified in the deployment configuration.
The bmtcl tool takes a while to run (around 30 – 45 minutes) and following messages would be displayed as shown in figure below.